teef
i fell down this rabbit hole after deciding i wanted my automated 7zip backups to also upload to a personal google drive.
the joke was on me thinking that surely someone had done it before..
well.. at least someone has now.
here’s a nice little guide to set it up, from start to finish
you can use the content tabs on the right-hand side to just skip to the script at the end if that’s all you’re looking for – I’d still suggest following steps 1 - 5 for the google cloud setup however
google cloud setup;
the first thing we’ll need to do here is create a new project in google cloud - if you haven’t done so before, just click create project over at your cloud dashboard
step 1: project
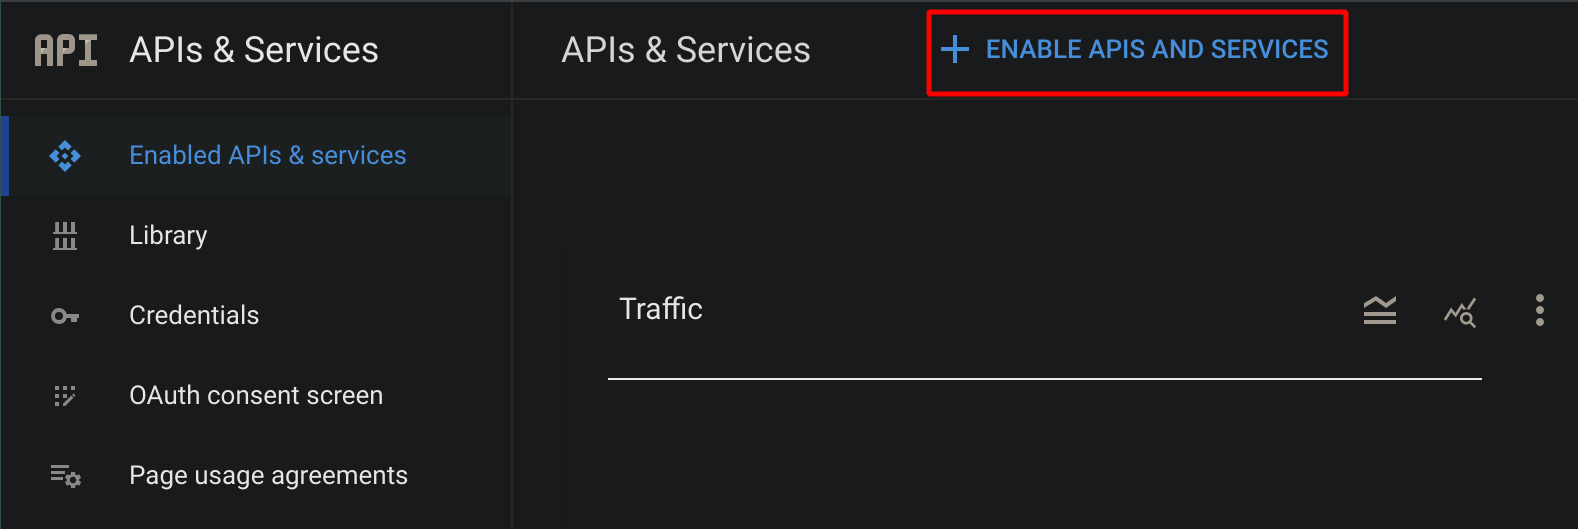
once your project is created, we’ll want to start by enabling the Google Drive API on our project.
- go to “Enabled APIs & services” to add it
 this will take you to an API library where you’ll just search for ‘google drive’ and
 Enableit once you find it
step 2: credentials
next we’ll navigate to ‘Credentials’ and we’ll start creating our OAuth creds:
next we’ll meet a ‘CONFIGURE CONSENT SCREEN’ prompt, which we’ll follow through with
step 3: scope
for each page, respectively:
- External
- Only need to fill App name, support email, dev email
- Click
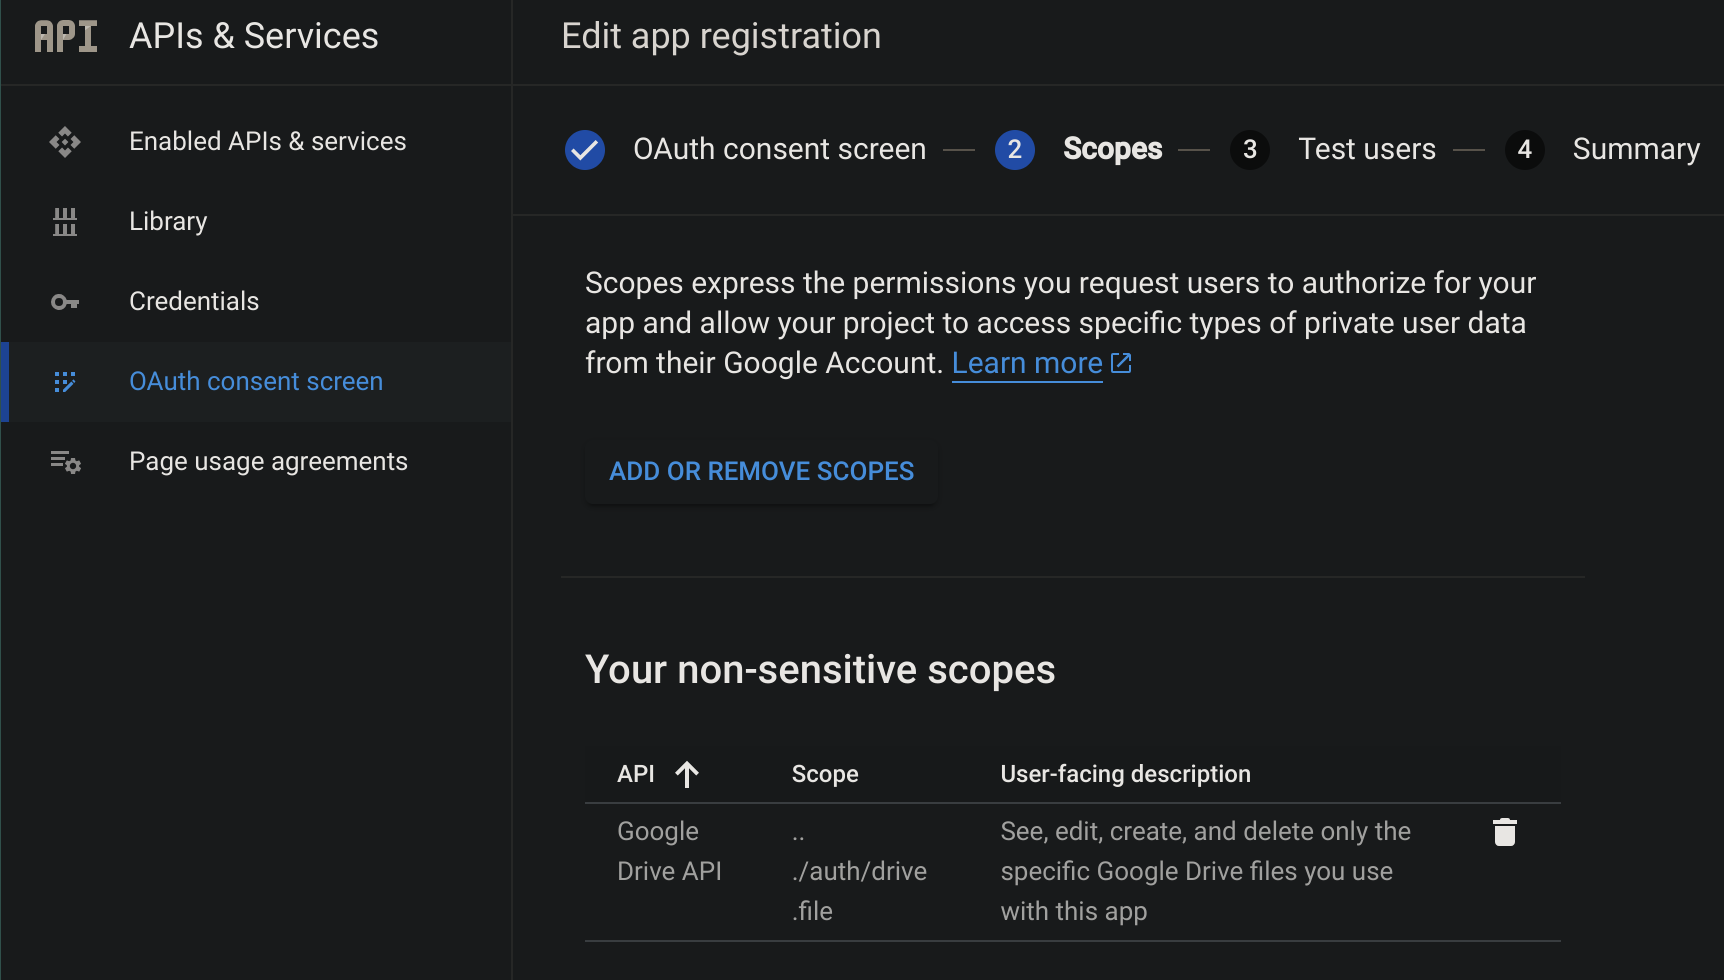
ADD OR REMOVE SCOPESand add the following- /auth/drive.file
if you don’t see any ‘Google Drive API’ scopes available make sure it was enabled
- /auth/drive.file
- Add yourself as a test user
step 4: create creds
now we can actually create our OAuth credentials!
refer back to step 2 to start the creation, but instead of a ‘CONFIGURE CONSENT SCREEN’ prompt, you’ll be greeted with proper creation steps:
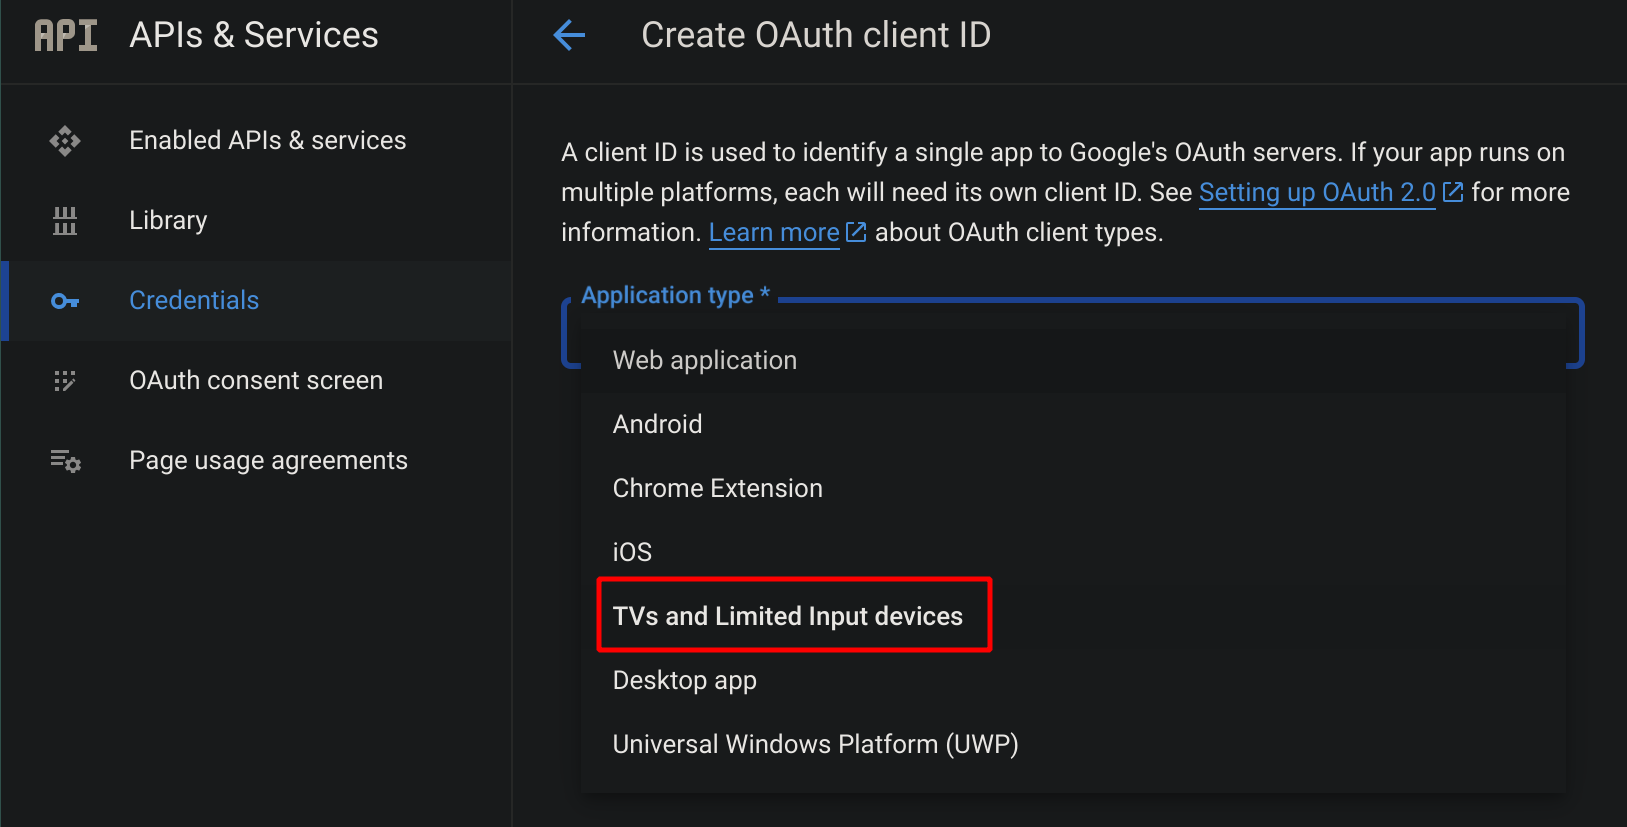
select ‘TVs and Limited Input devices’ as our application type
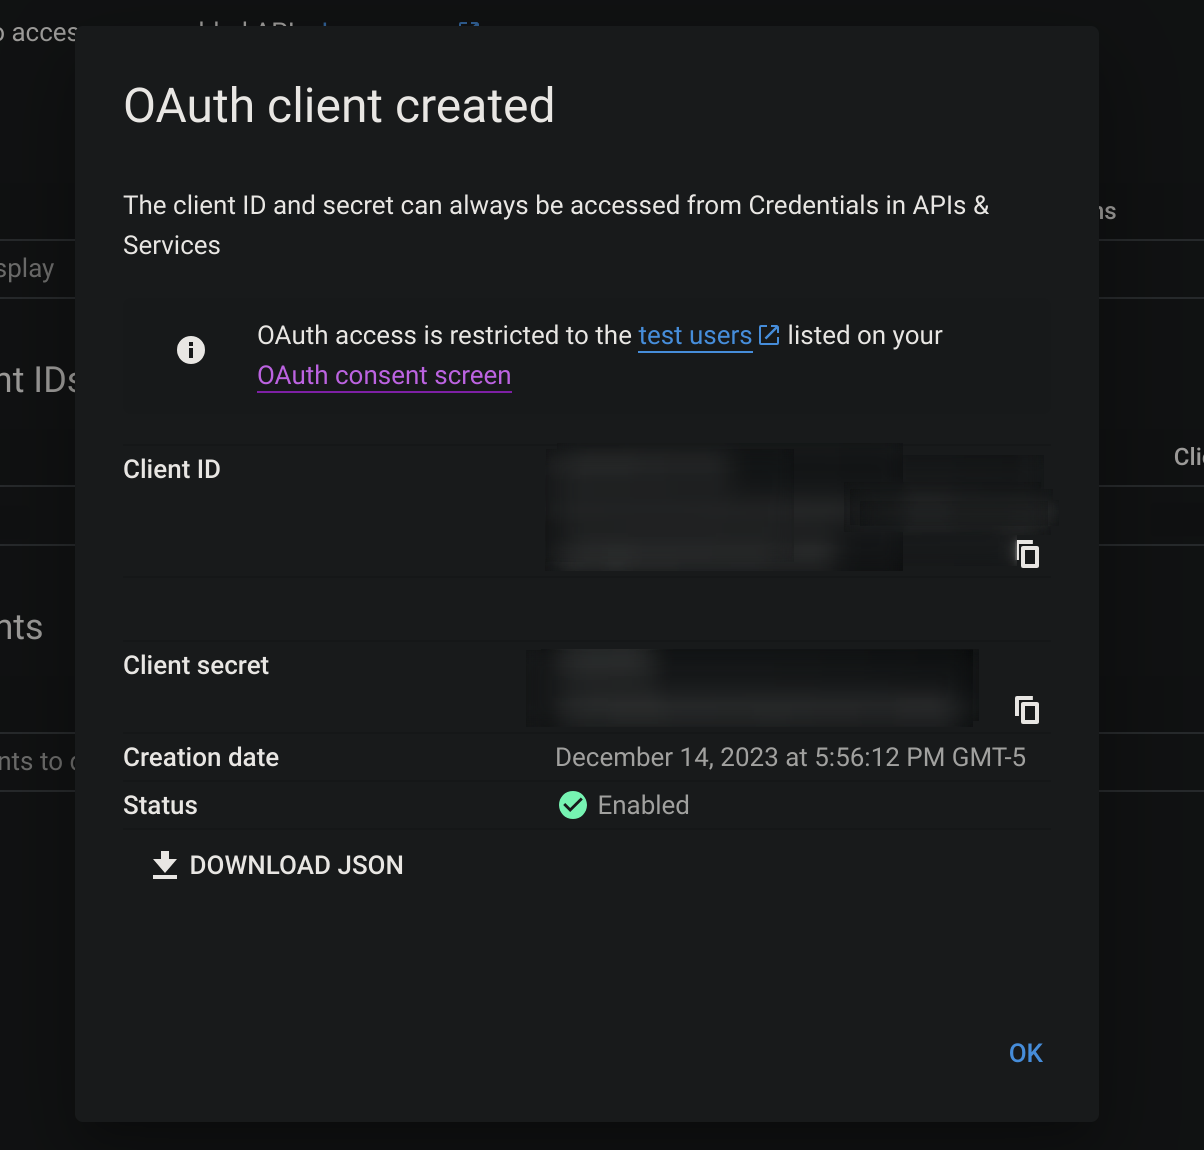
now we have our credentials for our client id and client secret!
step 5: auth token
verify our device:
1
2
3
4
5
6
7
8
9
┌──(b00ps㉿arielle)-[~]
└─$ curl -d "client_id=[XXXXX]&scope=https://www.googleapis.com/auth/drive.file" https://oauth2.googleapis.com/device/code
{
  "device_code": "xxx-xxxx-xxx",
  "user_code": "xxxx-xxx-xxxx",
  "expires_in": 1800,
  "interval": 5,
  "verification_url": "https://www.google.com/device"
}
obviously we’ll want to replace
[XXXXX]with our own client id
get used to this, you’ll need to do it again later for the python script (at least once)
now navigate to the “verification_url”, where you’ll be prompted to enter your “user_code”.
follow through the verification steps.
it’s from this point on that you can just skip to the script at the end via the content tabs.. the rest up until then is just a trial & error process of getting things working
step 6: access token
retrieve our access token:
1
2
3
4
5
6
7
8
9
┌──(b00ps㉿arielle)-[~]
└─$ curl -d client_id=[XXXXX] -d client_secret=[XXXXX] -d device_code=[XXXXX] -d grant_type=urn%3Aietf%3Aparams%3Aoauth%3Agrant-type%3Adevice_code https://accounts.google.com/o/oauth2/token
{
  "access_token": "[XXXXX]",
  "expires_in": 3599,
  "refresh_token": "[XXXXX]",
  "scope": "https://www.googleapis.com/auth/drive.file",
  "token_type": "Bearer"
}
obviously, ensure you replace the
client_id,client_secretanddevice_codevalues with your own
it was at this point that i realized this was indeed NOT such an easy solution…
after plenty of hair-pulling, i was finally able to get authorization to work thanks to this page from the documentation
as it turns out, a POST request is initially used to upload the file, but a separate PATCH request must be made to rename that file, using the file_id retrieved from the response to our POST request.
However, everything i tried to rename the file with the PATCH request would corrupt the file.
UPDATE:
The files were only corrupted if an extension was added while renaming, ie. “Untitled” -> “test.7z” - even though they are 7z files.
Renaming works completely fine if renaming to something without a file extension.
(This will be added in the final script on github)
now, here’s our upload request
1
2
3
4
5
6
7
8
┌──(b00ps㉿arielle)-[~]
└─$ curl -X POST -L -H 'Authorization: Bearer [XXXXX]' -H 'Content-Type: application/x-7z-compressed' -F 'file=@/home/b00ps/test.7z' https://www.googleapis.com/upload/drive/v3/files?uploadType=media --http1.1
{
  "kind": "drive#file",
  "id": "[XXXXX]",
  "name": "Untitled",
  "mimeType": "application/x-7z-compressed"
}
time to slap it all together into a…
python script;
(figuring out the logic for authorization and finding some way to encrypt the refresh_token locally also made this much harder than i expected, yet again..)
part 1: libs & vars
1
2
3
4
5
6
7
8
9
10
11
12
13
14
15
16
17
18
19
20
21
22
23
24
25
26
27
import subprocess
import json
import time, sys, select
from cryptography.fernet import Fernet

ZIP_DIR = '' # include trailing '/'  -  ex; '/home/kali/' to archive entire kali home dir
RF_DIR = '' # absolute path to where we're saving the refresh token
FILE_NAME = '' # '.7z' will be appended to the name
CLIENT_ID = '' # get from google drive oauth key
CLIENT_SECRET = '' # get from google drive oauth key

# Encryption key (replace with your key)
ENCRYPTION_KEY = b''

###### UNCOMMENT AND RUN FOR FIRST TIME KEY GENERATION #######

'''
key = Fernet.generate_key()
print(key.decode())
exit()
'''

######  *********************************************  #######


cipher_suite = Fernet(ENCRYPTION_KEY)
don’t forget to replace the constant variables with the ones that apply to your setup.
ZIP_DIR = ''this will be the directory you’d like to recursively archive. ex; for your home dir with all its file and subdirectories on kali you’d put ‘/home/kali/’
RF_DIR = ''this is the location your refresh token will be saved (to ensure automated pushes) -> make sure the user that’s running the script has the appropriate permissions to write here
FILE_NAME = ''the name of the compressed file. ‘.7z’ will be appended to whatever you place here
CLIENT_ID = ''credentials from step 4
CLIENT_SECRET = ''credentials from step 4
aaaalso take notice of the section that needs to be commented out when first run to retrieve the encryption key - which will be used to hardcode
ENCRYPTION_KEYthen recommented
to start with, this was the easiest way to set the constants as well as encrypt the refresh token locally.
unfortunately, this method requires a lot of user interaction via editing the script - but it worked well as a first draft.
the next goal is to slap these into a json config file to keep the user from having to edit the actual script.
as for encryption - i lack any experience working with it, and didn’t feel compelled enough to make that its own project at the moment, so that chunk of code may be sloppy..
part 2: functions
1
2
3
4
5
6
7
8
9
10
11
12
13
14
15
16
17
18
19
20
21
22
23
24
25
26
27
28
29
30
31
32
33
34
35
36
37
38
39
40
41
42
43
44
45
46
47
48
49
50
51
52
53
54
55
56
57
# compress directories
def compress_directories(ZIP_DIR):
    subprocess.run(['7z', 'a', '-r', f'{ZIP_DIR}/{FILE_NAME}.7z', ZIP_DIR])

# get device_code for access token request
def get_device_code(CLIENT_ID):
    device_id = json.loads(subprocess.check_output(f'curl -d "client_id={CLIENT_ID}&scope=https://www.googleapis.com/auth/drive.file" https://oauth2.googleapis.com/device/code -s', shell=True, executable="/bin/bash"))
    return device_id

# get access token for authorization
def get_access_token(CLIENT_ID, CLIENT_SECRET, device_code):
    access_token_data = json.loads(subprocess.check_output(f'curl -d client_id={CLIENT_ID} -d client_secret={CLIENT_SECRET} -d device_code={device_code} -d grant_type=urn%3Aietf%3Aparams%3Aoauth%3Agrant-type%3Adevice_code https://accounts.google.com/o/oauth2/token -s', shell=True, executable="/bin/bash"))
    return access_token_data

# get new access token with refresh token
def refresh_access_token(CLIENT_ID, CLIENT_SECRET, refresh_token):
    refresh_token_data = json.loads(subprocess.check_output(f'curl -d client_id={CLIENT_ID} -d client_secret={CLIENT_SECRET} -d refresh_token={refresh_token} -d grant_type=refresh_token https://oauth2.googleapis.com/token -s', shell=True, executable="/bin/bash"))
    return refresh_token_data.get('access_token')

# the meat! uploads to Google Drive using our access token
def upload_to_google_drive(access_token, file_path, file_name):
    subprocess.run([
        'curl',
        '-s',
        '-X', 'POST',
        '-L',
        '-H', f'Authorization: Bearer {access_token}',
        '-H', f'Content-Type: application/x-7z-compressed',
        '-F', f'file=@{file_path}{file_name}.7z',
        'https://www.googleapis.com/upload/drive/v3/files?uploadType=media',
        '--http1.1'
    ])

# handles authorization
def handle_authorization(CLIENT_ID, CLIENT_SECRET):
    device_code_data = get_device_code(CLIENT_ID)
    access_token_data = get_access_token(CLIENT_ID, CLIENT_SECRET, device_code_data['device_code'])

    return access_token_data, device_code_data

# encrypts refresh token and writes locally to the given refresh token dir
def encrypt_token(refresh_token):
    encrypted_refresh_token = cipher_suite.encrypt(refresh_token.encode())
    with open(f'{RF_DIR}rf_tk', 'wb') as file:
        file.write(encrypted_refresh_token)

# countdown function to keep track of device auth
def countdown(seconds):
    for i in range(seconds, 0, -1):
        sys.stdout.write(f"\r[---------- [{'#' * (i // 6) + '-' * (30 - i // 6)}] {i}s remaining ----------]")
        sys.stdout.flush()
        time.sleep(1)

        if sys.stdin in select.select([sys.stdin], [], [], 0)[0]:
            sys.stdin.readline()  # Clear the input buffer
            break
i think each func has a good little descriptor associated to it.. if you have any questions tho feel free to drop a comment or shout out via email, twitter, pgp..
the encrypt function will change with the implementation of openssl though
part 3: main logic
1
2
3
4
5
6
7
8
9
10
11
12
13
14
15
16
17
18
19
20
21
22
23
24
25
26
27
28
29
30
31
32
33
34
35
36
37
38
39
40
41
42
43
44
45
46
47
48
def main():
    # checks if a refresh token is saved locally
    try:
        with open(f'{RF_DIR}rf_tk', 'rb') as file:
            encrypted_refresh_token = file.read()
            refresh_token_exists = True
    except FileNotFoundError:
        refresh_token_exists = False

    refresh_token = None
    # if refresh token exists -> new access token obtained using it
    if refresh_token_exists:
        refresh_token = cipher_suite.decrypt(encrypted_refresh_token).decode()
        access_token = refresh_access_token(CLIENT_ID, CLIENT_SECRET, refresh_token)
    else:
        # if no access token, authorization handling begins
        access_token_data, device_code_data = handle_authorization(CLIENT_ID, CLIENT_SECRET)
        if 'error' in access_token_data:
            # refresh access token if it's expired
            if access_token_data['error'] == 'expired_token':
                refresh_token = access_token_data.get('refresh_token')

            if refresh_token:
                new_access_token, new_refresh_token = refresh_access_token(CLIENT_ID, CLIENT_SECRET, refresh_token)
                if new_access_token:
                    access_token_data['access_token'] = new_access_token
                    access_token_data['refresh_token'] = new_refresh_token

            # prompts user to authorize device if auth pending for access token
            if access_token_data['error'] == 'authorization_pending':
                print("\n\n*********************************************************\n"
                      "*********************************************************")
                print("\nFailed to refresh access token. Please authorize: \n")
                print("Verification URL: ", device_code_data['verification_url'])
                print("Enter code: ", device_code_data['user_code'])
                print("\n [!][!][!]  WAITING FOR AUTHORIZATION.  [!][!][!]"
                      "\nPress any key followed by Return[↵] once complete:\n")
                countdown(180)
                access_token_data = get_access_token(CLIENT_ID, CLIENT_SECRET, device_code_data['device_code'])
                encrypt_token(access_token_data['refresh_token'])
                access_token = access_token_data['access_token']

    if access_token:
        upload_to_google_drive(access_token, ZIP_DIR, FILE_NAME)

if __name__ == "__main__":
    main()
a lot of comments throughout again, same message as above applies
now to set this up;
-
after you add all your variables, you’ll want to uncomment lines 18-22 like mentioned, and run it once like that.
-
this will give you an encryption key that you’ll place into line 14 like-so
ENCRYPTION_KEY = b'[xxxxxxxxxxxxxx]'where [xxxxxxxxx] is the encryption key – comment lines 18-22 back out -
now the first time you run the program with your actual encryption key, it will prompt you to authorize the device (as we did in step 5)
it should look a little something like this:
1
2
3
4
5
6
7
8
9
10
11
12
13
14
15
16
17
18
19
20
21
22
┌──(b00ps㉿arielle)-[~/projects/backup-tool]
└─$ python backup.py


*********************************************************
*********************************************************

Failed to refresh access token. Please authorize:

Verification URL:  https://www.google.com/device
Enter code:  [XXXX]-[XXXX]

 [!][!][!]  WAITING FOR AUTHORIZATION.  [!][!][!]
Press any key followed by Return[↵] once complete:

[---------- [#########################-----] 152s remaining ----------]a
{
  "kind": "drive#file",
  "id": "[XXXXXXXXXXX]",
  "name": "Untitled",
  "mimeType": "application/x-7z-compressed"
}
follow what we did in step 5, then in your terminal press any key followed by Return(/enter) and that’s it!
The next time the program runs it will require zero interaction (as long as the rf_tk file can still be found where you told it)
setting up linux service;
setting up the service to automate the whole process
script;
1
work in progress.. poke me via email / twitter if you're impatient


Comments powered by Disqus.